Hazard Identification and Ranking
The structured process for identifying every significant hazard in a work area, assessing each one by likelihood and consequence, and classifying them into tiers that drive where the safety effort goes.
You cannot control a hazard you have not found.
Most sites have a list of known hazards somewhere. It might be in a risk register, a site safety file, or a folder that was last updated when the site was commissioned. The hazards on it are real. The list is not the problem.
The problem is what happens between the list and the work.
The team on the line does not consult the risk register before they start a shift. The new operator who joined last month has not read the safety file. The maintenance technician who is about to open a panel on a piece of equipment that was modified six months ago is working from memory, not from a current assessment.
A hazard that has been identified and filed is not a hazard that has been controlled. It is a hazard that has been recorded. The gap between recording and controlling is where incidents happen.
Hazard identification and ranking closes that gap. It produces something specific and usable, a current, accessible picture of every significant hazard in the work area, assessed by how likely it is to cause harm and how serious that harm would be, classified into tiers that tell the team and their leaders where to focus, and connected to the controls that are actually in place. That picture is the safety map. It is the output of this process and the starting point for everything else in the Safety pillar.
What this process is
Hazard identification and ranking is a structured assessment of every significant hazard in a defined work area. Each hazard is identified, described specifically, assessed against two criteria, likelihood and impact, and classified into one of three tiers. The controls currently in place are recorded alongside the hazard, and the residual risk, the risk that remains after the controls are applied, is assessed.
The output is the safety map: a documented, visual record of the hazards in the area, their ranking, their controls, and their residual risk. The safety map is not a compliance document. It is a working tool. It is used in team briefings, in AM step preparation, in inductions for new team members, and in the review that happens whenever the work area, the equipment, or the process changes.
The ranking is not a one-time exercise. It is reviewed whenever something changes, new equipment, new process, new layout, new product, new working method, and at least annually. A ranking that has not been reviewed since the last change is a ranking that is describing a work area that no longer exists.
The two assessment criteria
Each hazard is assessed against two criteria independently. The combination of the two determines the tier.
Likelihood. How likely is this hazard to result in harm? This is not the likelihood of the hazard existing, it is the likelihood of it causing an incident given the controls currently in place. A hazard that is present every shift but is well controlled has a lower likelihood score than one that is present occasionally but has no reliable control. Likelihood is scored against the actual situation, how often is the hazard encountered, how reliable are the current controls, and how often do similar events occur on this site or in this industry?
Impact. How serious is the harm if an incident occurs? Impact covers the full range, from minor injury requiring first aid, through injuries requiring medical treatment or lost time, to permanent disability or fatality. It also covers harm beyond the individual: damage to equipment, environmental consequences, regulatory consequences, and reputational impact. A hazard with a low likelihood but a catastrophic impact sits in a different tier from one with a high likelihood but a minor impact.
The ranking tiers
Three tiers is enough. More than three creates false precision. Fewer than three does not give enough differentiation to drive meaningful decisions.
Tier 1 — Critical. The hazard has a high likelihood of causing harm, a severe consequence if it does, or both. Tier 1 hazards require the most effective control available, the highest level of the hierarchy that is practical. They are reviewed at every TAM tier until the control is confirmed and stable. Every near miss involving a Tier 1 hazard is investigated. No Tier 1 hazard is accepted as uncontrolled.
Tier 2 — Significant. The hazard has a meaningful likelihood or a meaningful consequence, but not both at the highest level. Tier 2 hazards require a documented control at an appropriate level of the hierarchy. They are monitored and reviewed. Recurring near misses involving Tier 2 hazards are investigated.
Tier 3 — Managed. The hazard has a limited likelihood and a limited consequence. It is controlled through standard working practices, PPE, or procedural controls. It is recorded and reviewed annually or when the work area changes.
How to run the assessment
Work through the five steps in order. The assessment is only as good as the inputs. A hazard identification done in a meeting room from memory will reflect what people remember, not what is actually present in the work area.
Step 1 — Define the scope. Identify the work area, the equipment, and the tasks to be assessed. Be specific. A vague scope produces a vague assessment. The scope should cover every task performed in the area, routine tasks, non-routine tasks, maintenance activities, cleaning, changeovers, and any task performed by contractors or visitors. Non-routine tasks are where many incidents occur, because they are performed less frequently and the controls are less embedded.
Step 2 — Walk the area and identify the hazards. Do not assess from a desk. Walk the area with the people who work in it. Look at every piece of equipment, every task, every interface between people and machinery, every stored material, every access route. Ask the team what they find difficult, what they have learned to work around, what they would not want a new person to do unsupervised. The team carries knowledge about the hazards in their area that is not in any document. This step is how you access it.
Identify hazards by type. The common categories include:
- Mechanical — moving parts, pinch points, sharp edges, stored energy
- Electrical — live conductors, isolation points, energy sources
- Chemical — hazardous substances, cleaning materials, process chemicals
- Physical — noise, vibration, temperature extremes, radiation
- Ergonomic — manual handling, repetitive motion, awkward postures
- Environmental — slips, trips, falls, working at height, confined spaces
- Organisational — lone working, shift patterns, high-risk windows, production pressure
For each hazard, describe it specifically. Not "moving parts", "exposed drive belt on the infeed conveyor, accessible during jam clearance without isolation." The more specific the description, the more useful the assessment.
Step 3 — Assess each hazard against the two criteria. Score likelihood and impact independently, using a defined scale. A 1 to 5 scale works well for each criterion, with clear descriptions for each score level. The descriptions matter, a score of 4 on the impact criterion should mean the same thing to every person doing the assessment.
Record the controls currently in place for each hazard before scoring. The likelihood score reflects the situation with current controls in place, not the theoretical worst case. A hazard with a robust engineering control has a lower likelihood score than the same hazard with only a procedural control.
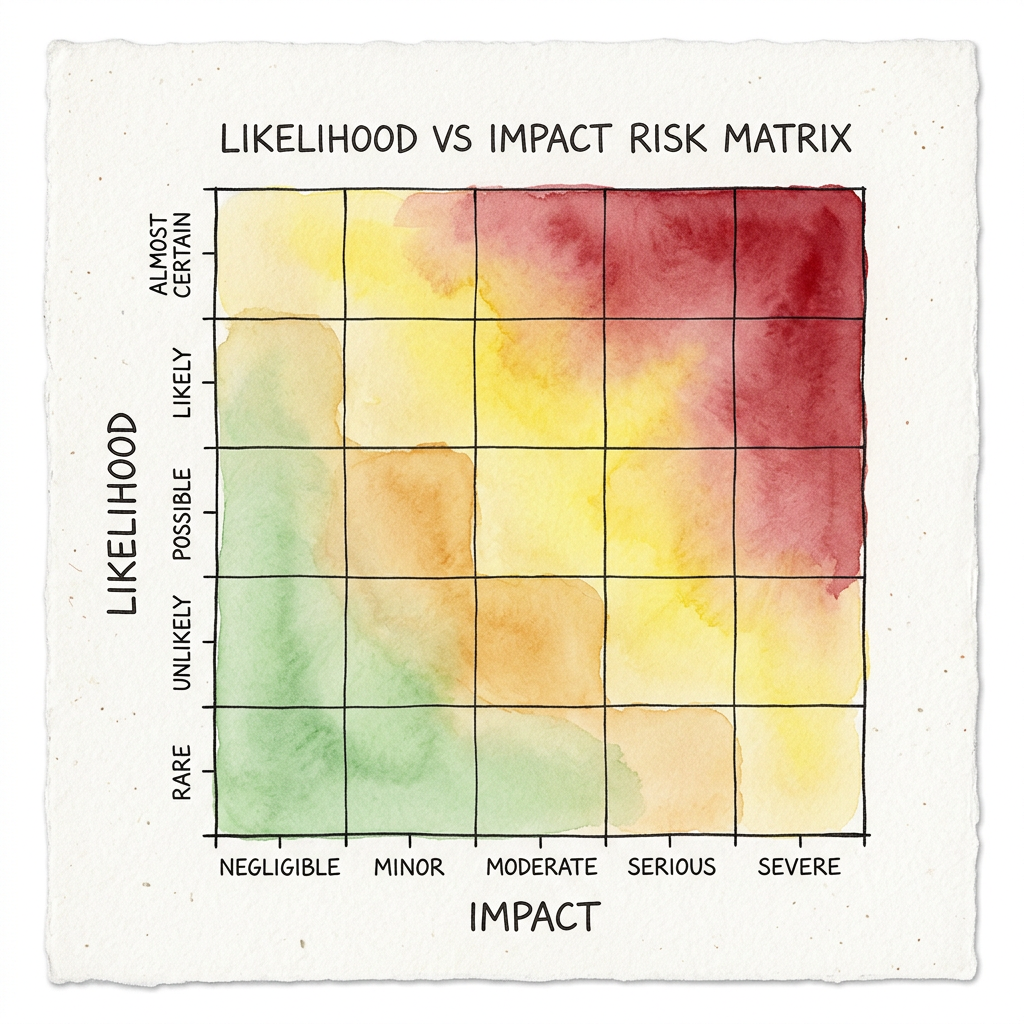
Step 4 — Calculate the combined score and assign the tier. Multiply the two scores to produce a combined score. Set the tier boundaries based on the distribution of scores in the area. The goal is a meaningful spread across the three tiers, not a system where everything ends up in Tier 1.
Apply the override rule: any hazard with a potential fatality or permanent disability outcome is Tier 1 regardless of its combined score.
Step 5 — Review, validate, and sign off. The assessment is not complete until it has been reviewed by the people who work in the area every day. Operators, technicians, and maintenance staff will identify hazards the walk missed, failure modes the scoring did not capture, and rankings that do not match their experience. That challenge is part of the process. An assessment that cannot withstand it needs to be revisited.
The validated assessment is signed off by a named originator and a named approver, typically the area leader and the Safety pillar team member or HSE representative. It is dated. It is not filed. It is used.
The safety map
The safety map is the output of the hazard identification and ranking process. It is a documented, visual picture of the equipment or work area that shows every significant hazard, where it is located, what controls are in place, and what the residual risk is.
A good safety map has four characteristics:
It is visual and equipment-specific. The map is built around a picture or drawing of the actual equipment, a photograph, a sketch, or a schematic. Symbols are placed on the image at the location of each hazard. Two machines that do the same job but are configured differently need two different safety maps. A generic map is not a safety map. It is a template.
It uses a consistent colour code. Symbols are colour-coded by type, and the colours are consistent across the site, one potential example is:
- Red: hazards and energy sources (moving parts, electrical isolation points, hot surfaces, chemical risks)
- Green: safety devices (LOTO points, emergency stops, guards, interlocks)
- Blue: PPE requirements (gloves, eye protection, hearing protection)
The colour code means the map can be read quickly by anyone, including someone who does not speak the site's primary language. Language should not be a barrier to understanding a safety map.
It is permanently attached to the equipment. The map is laminated and held in a document holder on the machine or in the work area. It is not in a folder in an office. It is not on a shared drive. It is at the point of work, available to anyone who needs it before they start a task. A safety map that is not at the equipment is not being used.
It evolves with the equipment. Both the equipment and the safety map change over time. A modification to the equipment, a new isolation point, a changed process, any of these requires the map to be reviewed and updated before the change goes live. The map and the equipment evolve in parallel. A map that predates the last modification is not current.
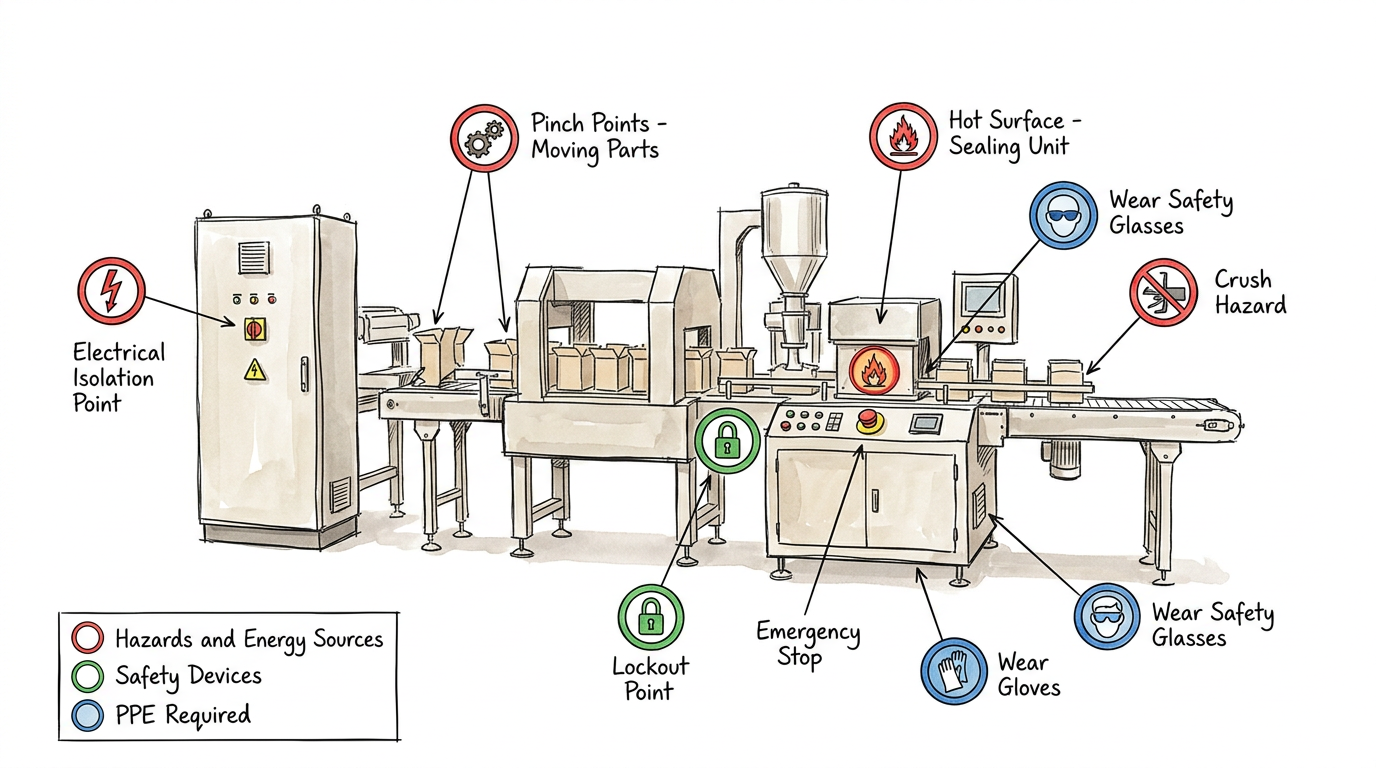
Sign-off and review. Every safety map has a named originator, a named approver, a creation date, and a revision date. The approver is typically the Safety pillar team member or HSE representative for the area. The map is reviewed at least annually and whenever the equipment or process changes.
The safety map is a prerequisite for AM Step 1. No team begins the initial cleaning and inspection of a piece of equipment without a current safety map for that area. The map identifies the isolation points, the energy sources, and the restricted access zones that the team needs to know before they get close to the equipment. The Safety pillar team is present at AM step preparation to confirm the map is current and to walk the team through it.
When to review the ranking
The ranking is reviewed, not restarted, when any of the following occur:
- A near miss or incident occurs involving a hazard in the area. The ranking was wrong, the control failed, or a new hazard was present that the assessment did not capture.
- New equipment is installed or existing equipment is modified. New hazards need to be identified and ranked before the equipment enters service.
- A process change alters the tasks performed in the area, the materials used, or the frequency of exposure to existing hazards.
- A new working pattern is introduced, new shift times, new staffing levels, lone working, contractor access.
- One of the high-risk windows applies, return from shutdown, new team members, significant change in production pressure.
- Annually, as a minimum. The ranking should be reviewed at least once a year to confirm it still reflects the current state of the work area.
What the ranking drives
The ranking is only useful if it changes how decisions are made.
Control selection. The tier determines the minimum level of the hierarchy of controls required. Tier 1 hazards require the most effective control available. Tier 2 hazards require a documented control at an appropriate level. Tier 3 hazards are managed through standard practice. The ranking is the input to the control decision, not an output of it.
AM step preparation. The safety map produced by this process is the document the Safety pillar team uses to brief the AM team before Step 1 begins. Every isolation point, energy source, and restricted access zone is identified and communicated before the team touches the equipment.
Induction for new team members. A new team member's induction includes a walk of the safety map for their area. The ranking tells the induction leader which hazards to spend the most time on and which controls to demonstrate rather than just describe. The map is the tool. The walk is the transfer of knowledge.
Process Confirmation. Safety-critical controls on Tier 1 and Tier 2 hazards are confirmed through the frontline leader's Process Confirmation routine. The ranking determines which controls are on the confirmation schedule.
Near miss investigation priority. The tier of the hazard involved in a near miss determines the urgency of the investigation. A near miss involving a Tier 1 hazard is investigated immediately. A near miss involving a Tier 3 hazard is recorded and reviewed at the next safety review.
TAM agenda. Tier 1 hazards with open or unresolved controls are on the TAM agenda until the control is confirmed and stable. The ranking makes the conversation about safety visible in the same room as the conversation about production.
What this gives you
Common pitfalls
Key Links
Hazard identification and ranking is the foundation of the Safety pillar. Every other process depends on it.
The ranking tells you which hazards to prioritise. The hierarchy of controls tells you what to do about them.
The safety map produced by this process is a prerequisite for AM Step 1.
Safety-critical controls on ranked hazards are confirmed through Process Confirmation.